June 30, 2011

Surprise!

Look at the wonderful surprise Steve found in the garden earlier this week.


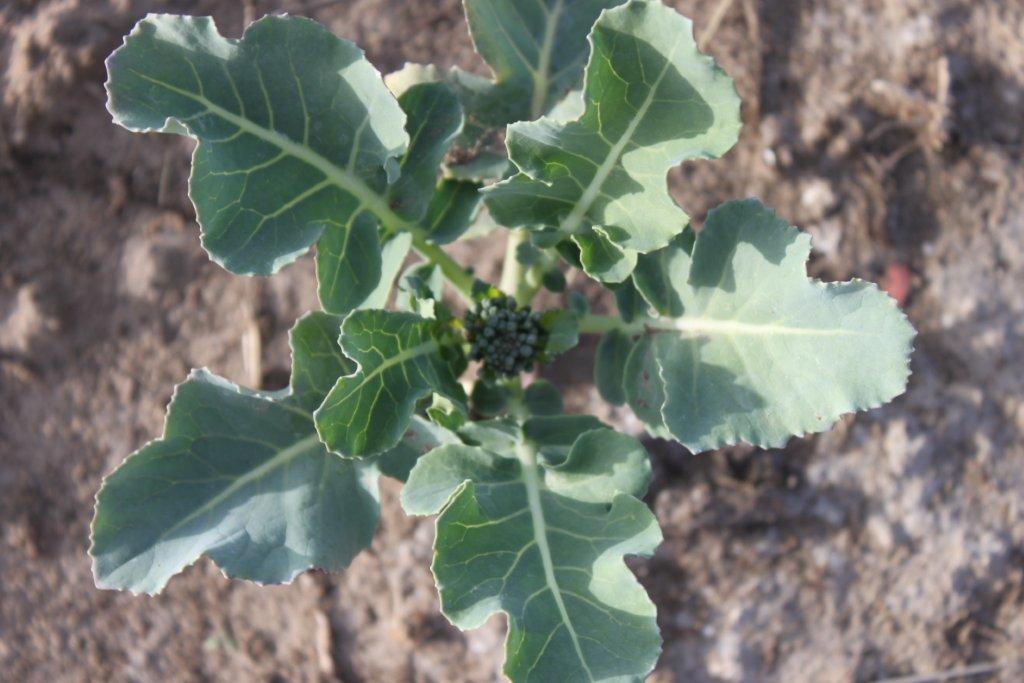
This year is my first attempt at growing broccoli.  I planted four plants and they all survived after being transplanted.  Two plants are large and the other two are quite small and stunted.  I don’t really know why two are stunted and the others are fine; they are grown side by side and get the same amount of sun and water.  The only thing I can think of is they got frozen when it snowed in the beginning on June.  After the snow the two small ones had leaves turn pink & purple (they were frozen) and they never seemed to recover.  They are still alive, just not growing at the same rate as the others.  Due I dare say that maybe the grubs are eating them too!

When I first started talking about trying some broccoli plants in the garden I was told by multiple people that broccoli was hard to grow because it attracts lots of bugs and caterpillars.  Apparently the little worms that you get in radishes and turnips can be found it broccoli florets – gross!  I’ll have to keep a close eye on the florets as they develop and keep a light dusting of DE on them and their leaves in an attempt to keep pests away.  DE to the rescue again… hopefully.

Anyway, one large and one small plant have started to grow florets and I thought I would share this exciting news with you!


Blaming the Wrong Pest?

About 2 weeks ago I came upon an unsettling discovery in the garden.  It was a rainy day and I had decided it was time to brave the elements and head out to the garden to see how things were handling the heavy rain. 

For the most part everything was flourishing in the rain except for small, random sections of spinach, swiss chard and beets.  My first thought was maybe we had accidentally stepped on the rows, or that it was just too wet for the small seedlings.  I picked up the wilted leaves to take a closer look – they had no roots.  My heart sunk; what was eating my plants??

Swiss Chard Damage (recent)
Spinach Damage (a few weeks ago)

My first thought was cutworms.
I recalled reading a recent newspaper article about a “Pest Alert” issued by The County regarding flea beetles and cutworms.   It said recent surveys conducted by the County’s Agricultural Pest and Disease department had identified higher than usual numbers of Flea Beetles and Cutworms and cautioned farmers to be on the lookout as they could be a serious threat to this year’s crops.
Last year I think I dug up maybe 2 or 3 cutworms all season; this year I had seen at least that many in one day of weeding.  It had to be cutworms. 
Cutworms are actually caterpillars, not worms.  They are moth larvae that live in soil during the day and come out in the dark to feed on plants. They attack the first part of the plant they encounter, namely the stem and consequently cut it down; hence the name cutworm.  They typically attack small plants and seedlings as they need to wrap themselves around the stem to eat it. They more or less eat the base of the plant, severing it from the roots, leaving the leaves, and moving on to the next; kind of like a beaver cutting down trees.

Cutworm (they curl up when threatened)
The only problem is how do you get rid of cutworms? Off to the computer I went to figure out how to get rid of them.  The number one suggestion was to put “collars” around the base of your plants to keep the cutworms away.  It would be hard to do this considering they were attacking rows not individual plants.  The next suggestion was to place DE around your plants.   (DE again, go figure.)  This would work but with the garden being so wet it would be ineffective.  And then I stumbled across “cornmeal.”  Apparently the little trouble makers love cornmeal but their bodies are incapable of digesting it and die of indigestion.  Perfect! I had lots of cornmeal and what would be better then torturing them with indigestion for eating my plants.

Line of Cornmeal & DE by Spinach
 Out to the garden I went again, but this time with a container of cornmeal. (I mixed some DE in the cornmeal to create what I thought would be a lethal mixture.)  I sprinkled it along the areas where the damage was to draw the cutworms away from my plants.  And then I went back inside to wait. 
A few days later, in the rain, again, I ventured out for another inspection.  The cornmeal looked a little scattered from the rain, and possibly, hopefully from the cutworms.  There appeared to be no new damage.  Had I won the battle?? Was it that easy??  Of course not.

Last weekend when I was weeding I caught the real culprit red handed.  In the roots of my beets, I saw a small white grub gorging itself on the roots just below the surface.  Grubs? Seriously?  Great, just great.

June 28, 2011

Garden Update #3 - Week 5

I must admit I’ve been feeling a little lost for words this week.  I think I’m still recovering from my weekend weeding frenzy.

The garden is now 5 weeks old, or was on Sunday the 26th.  Everything is growing at an okay rate.  We have received a significant amount of rain again that was accompanied by cooler than average temperatures.  Everything is responding well to all the moisture and it seems as though the ants have left and moved to higher ground (knock on wood), now only if we would get some warmer temperatures.


Beans - reseeded

Last week I replanted a few beans because there were some that didn’t germinate.  They have taken to the moisture and are now starting to grow to fill in the dead spots.   I’ve also noticed that some of the plants seemed to be dying, specifically the spinach, swiss chard and beets.  I’ve had many theories about this issue and have decided it will be the topic of my next post. 


Radish with Root Worm


The potatoes, onions and tomatoes seem to be behind where they were last year this time but everything else is on track.  We even snacked on some more radishes, and unfortunately, a few had some unwanted company this time. 


The peas are growing like crazy and once I have time to thin the beets, turnips and carrots I’m sure they’ll take off as well.  Thinning is on the agenda for the long weekend, weather permitting.

Starting to thin the beets
Last weekend, in between all the rain, I managed to get into the garden and do some weeding.  I must admit it is soooo much easier to weed right after it’s rained and the soil is wet.  When it’s dry it’s like trying to pull them out of concrete.  It might be a little dirtier to weed when the dirt is wet but it is so much easier to get the task done.  Finally getting some weeding done makes the garden look much better and also makes me feel better.  All that’s left to weed now is the potato patch.

Instead of fighting to post pictures within the blog, I’ve decided to added a “Week 5” album to the Thirsty Dirt Facebook page.  You should hopefully be able to link on the link below to be redirect to the page.  If not, just log onto Facebook and search “Thirsty Dirt.”


http://www.facebook.com/pages/thirstydirtblogspotcom/150263811709695

June 22, 2011

“I Atehay Eedsway”

For those of you not fluent in Pig Latin, “Atehay Eedsway” translated into proper English means “Hate Weeds.”
Weeds drive me crazy.  I hate weeds and if I could, I would pick every single one I could find but unfortunately I don’t have the time to do that.  I fret endlessly about weeds while Steve thinks they aren’t a big deal and that there’s no need to worry about them because they’ll still be there tomorrow.  And you know what? He’s right, they will be there tomorrow but there will be more and they’ll be bigger!!
Steve and I have different methods of weeding.  He’ll attack the garden with a hoe, loosening the dirt while picking up the larger weeds.  It’s a quick, semi-effective method but not up to my standards.  I will crawl around on the ground with my weed bucket and little shovel digging up every weed I see.  It’s a time consuming method because, depending on the weed, I’ll dig half way to China trying to get as much root as possible.  I like to think my method is more effective. 
Method 1 - June 13th Weeding                                                             Method 2 - June 18th Weeding


The main weeds we encounter in the garden are pig weed, stink weed, horsetail and quack grass.  The pig weed and stink weed grow quickly and are easy to remove once they are bigger and if the soil is loosened.  You have to be careful with the pig weed because it likes to play dead; it’ll almost fall over and look like a pulled weed you dropped but its still firmly in the ground.  The quack grass and horsetail are a different story.  

Quack Grass with roots


Quack grass looks like grass but has a much wider blade.  It can have an extensive mat of underground roots where multiple blades of grass grow from.  They are a perennial and if you don’t remove the entire root system they will come back again and again and again.  Thankfully, there isn’t much, if any, quack grass in the garden this year; it seems to be confined to the raspberry patch.


Horsetail between rows
My new number one enemy is the Horsetail.  Until recently, it was referred to as “that friggin’ swamp like weed”.  It is similar to the quack grass in that it has an extensive root system that is almost impossible to remove.  It likes moisture and has a tendency to grow amongst the plants making it extremely difficult to remove.  It breaks off easily so digging, in my opinion, is the best way to remove it.  Quite often when I tackle one plant by the time I get a large section of the roots, there are other plants that are attached to the same root system.   Provided the soil isn’t like concrete they are easy to dig up and remove, just next to impossible to get the entire root system.

I have finally finished a few projects that were eating up my time and as we are currently having a break from the rain, weeding is the only thing on my agenda.  I like having things neat and tidy, garden included, and having the garden look “messy” with weeds drives me crazy.  Sometimes I feel overwhelmed by the weeds because I wanted it all done yesterday and I don’t know where to start.  To deal with this issue I have developed a plan of attack that seems to work well for me: I attack one row at a time and hopefully everything is done before I need to re-weed where I started.
Wish me luck!

Deer Fence – Con # 1

When we first installed our new Deer Fence our main concern was keeping the birds from getting stuck in it.  On occasion we have watched a robin bounce off of it but thankfully we haven’t had to remove anything from the mesh.
The Deer Fence is posing to be an issue with the weeds.  Yes, that’s right, the weeds. Friggin’ weeds!  Because the fence goes right to the ground, the weeds are actually pushing the fence mesh up creating a space under the fence.  Last year Steve would trim the grass and weeds around the garden with the weed whacker because the electric fence didn’t go right to the ground, this year he can’t because it will cut the mesh.

To make matters worse, the weeds are creeping into my sunflowers so even if he did use the weed whacker he would probably cut the sunflowers as well.
The plan was to try lifting sections of the mesh high even for Steve to get the weed whacker under.  What a “fun” adventure that was.  (Can you pick up on the sarcasm?)  Needless to say this method did work.  And it was fun if your idea of fun is getting splattered with weed and dandelion goop at 100 miles per hour while being eaten alive by mosquitoes.
Now that everything under the fence is trimmed the next step is apply Round Up to the weeds and grass that border the garden to stop them from re-growing.  This is something that will hopefully be done soon because I will not be doing that again!                 

Before

After

Did I mention I’ve decided that we’re going back to the electric fence next year?
      

June 21, 2011

Rain, Rain and More Rain

I think it’s time to rename my blog Soggy Dirt. 
Last week we received a significant amount of rain; about 1 ¾” over a 5 day period.  Thankfully on the fourth day we had a break from the rain which allowed for some well needed weeding time.  Looking at the forecast, I see we are expected to get another 35mm to 50mm (approx 1.5 to 2 inches) over a 2 day span later this week.  It’s a good thing our rain gauge is monstrous or we might have to dump it and start from zero.
Don’t get me wrong, all this rain is a good thing; especially in this area of the country where the farmers are now grinning ear to ear as they watch their fields grow.  As much as people complain, it’s good for everything, not just the farmers.  The fire hazard is almost nonexistent, the pine and spruce trees are recovering from the past few years of drought, the poplars are thick and lush, the under growth in the bush is thick and green, dug outs and lakes have returned to normal levels and everyone has a green lawn.  And not to mention all our water barrels are now full and overflowing: we currently have approximately 500 gallons (+2000 liters) of stored water at the moment.
Since the day we planted the garden we have watered it religiously but nothing is better than a plentiful drink from Mother Nature.  Since the rain, we have seen the potato plants grow at an alarming rate and everything else has come close to doubling in size.  My beets and turnips could stand to be thinned already, another week or so and we could probably eat spinach, the tomato plants are starting to bloom and we picked and ate a few small radishes yesterday.  And did I mention the weeds are growing like crazy too?  I can only imagine what would happen to everything with a little bit of heat thrown into the mix.
The only downside to all this rain is that it’s difficult to get into the garden to do anything and I desperately need to do some serious weeding.  If I could, I would love to have a weed free garden but I would probably have to quit my day job and cut back on sleep to accomplish that task.
I wish I had taken pictures of my soggy garden to show how wet it was – next time.

June 13, 2011

The Trials & Tribulations of Blogging

I like blogging.
Most times I find myself with an endless list of topics I want to discuss yet I seem to find little time to get them out of my head and onto the computer.  Well, that’s not necessarily true.  I do find time to get most thoughts out of my head and onto the computer, but in a Microsoft Word document; it’s the process of posting to the Blog where the trouble lies.  I tend to get frustrated with the process of posting.  I find the tools necessary to create, edit and insert photos cumbersome.  Hopefully with time it will become less of a pain in the but-tock.  (I think it might help if I stop posting my entries at 11 o’clock at night too.)


If I could blog telepathically it would be perfect! I would have a thought and Voila!  It would be posted!  Because I can’t do this, I tend to stock pile my entries in Word documents and post several at once when I find the patience to do so.
So bare with me and if I post multiple entries at once, you now know why.
Oh, and please feel free to comment on any post and “Like” my thirstydirt.blogspot.com Facebook page to get new posting notifications.

Garden Update # 2 - Day 22

The past week has seen cooler nights with a few frost warnings and very little rain.  This has led to being attacked by mosquitoes almost every night when watering and to a few stressful nights hoping everything would survive the cooler temperatures.

Despite getting little precipitation, we haven’t had to haul water yet this year and when we do, it will be a much shorter haul than last year.  As it turns out, there are benefits to being neighbourly.  This winter we received an above average amount of snow and Steve plowed our neighbor’s driveway on several occasions.  In turn, they have graciously offered us access to their shallow well and pump should we ever be in need of water.  (They are gardeners too.)


Getting back on topic, despite some cooler nights, the garden has continued to grow at a steady pace.  The zucchini, spinach, and radish are starting to get their “real” leaves; in fact, I even thinned the radishes already. 
My original tomato patch is getting hardier and stronger with each passing day – thank goodness!  The plants that were put in the ground last week look like the originals did a few weeks ago (they look a little pathetic), but I’ll sure they will get hardier like the others.
Tomatoes - 22 days


Tomatoes - 8 days
The peas are growing like weeds, and there are plenty of weeds too!  Yesterday afternoon we put up some chicken wire for the peas to climb and by the end of the day they were already latching on.


 Oh, and the potatoes are finally making an appearance along with the sunflowers.  On Friday the first potato plant broke through the ground and by Sunday all the Norlands were showing.  There has yet to an appearance made by a Yukon Gold but the ground is starting to crack and lift around a few so hopefully it wouldn’t be long before they are all showing.
Norland (red) Potato Plant
As for the sunflowers, they are everywhere!  Last year we planted a row along the north border of the garden and we did the same this year.  I soaked the seeds in warm water for a few hours before planting and they started to emerge within a week – sweet!   (I planted them last Sunday.)  We also have several rogue sunflowers throughout the garden from last year’s flowers.  We will probably try to transplant these once they get bigger.

Sunflower(L) seeded last fall, Sunflower(R) planted a week ago

Now that everything is growing, weeds included, it’s time to dig out the garden tools and start attacking weeding! Oh the fun begins!

Rhubarb

Rhubarb has never been a favorite of mine.  When I was younger I could never understand how people could grab a piece of it and eat it as is.  I could never understand the fascination some people have with it. 
When I think of rhubarb and my youth there are two memories that are predominate: (1) being afraid of bears when going to look at the Rhubarb patch at my grandparent’s campground and (2) being annoyed with all the tourists that just had to have a piece of Yukon Rhubarb Strawberry pie. (Little did they know there was nothing “Yukon” about most pies.)         
As I get older I appreciate the taste and texture a little more and enjoy the tartness of it.  I have a few muffin and cake recipes I use it in.  I also use it as a substitute for apple in some recipes.   A word of caution, you have to be careful when cooking with rhubarb as it can make your end product very moist.
 Our rhubarb plant is huge.  Some of the stalks at the base of the plant are over 2.5 inches in diameter.  When the plant gets too big and goes to seed, we will probably cut it down to the dirt and let it re-grow. 


I think this year I might have to take advantage of this huge plant and experiment with different recipes.  As it’s early in the year, I’m not concerned about harvesting rhubarb for future use.  Every time I need some for a recipe I’ll go cut a few stalks.  When fall does approach I may consider freezing some for the winter months. 
The nice thing about rhubarb if you are going to use it in baking is you don’t have to blanche it before you freeze it.  It will go mushy after freezing but it goes mushy when you bake it anyway, just add it to your recipe while it is frozen.  
Helpful Hint: Before you freeze it, be sure to prep the rhubarb as if you were prepping it for your baking.  It also helps to freeze it in bags or containers in the quantities that you use in your baking.  EX: one of my recipes calls for 1 cup of rhubarb so I place one cup of chopped rhubarb in each bag.  When I do my baking I already know how much is in the bag/container so I merely have to dump it in.

June 05, 2011

Garden Update # 1 – Day 14

It’s almost 14 days to the minute that we planted the garden.  The seedlings started emerging from the ground at the end of last week and now everything is up except for a one zucchini seed and the potatoes.  I’m not surprised the potatoes aren’t up yet as they were planted fairly deep and they didn’t have very many eyes.  The zucchini I’m sure will make an appearance in a day or two as the ground is starting to crack and lift where it was planted.

zucchini, day 14
We’ve had some fairly warm weather with little rain the past two weeks and we were starting to discuss hauling water already.  A few days ago this all changed as the temperature dropped drastically and we were given the gift of snow from Mother Nature along with ¾ of an inch of rain; needless to say we are well stock with water again. 
Today, Day 14, it is was a comfortable, sunny 19C.  I took advantage of the dry, sunny weather to tidy up the garden after the mess we made when we covered everything a few days ago.  The garden was like a mini mud bog at that time so the dirt needed to be raked out and leveled or we would have craters from our boots for the entire summer.

Tomato Patch, 24 plants, day 14
I had a few spare tomato plants hanging around incase I needed to replace a few that flew victim to frost. 

Since they all survived the first 14 days and Friday's snow we decided to plant the extras and increase the size of our tomato patch. 
My tomatoes were also looking a little sickly due to the high UV we’ve had this year.  The UV was starting to bleach some of the larger older leaves whereas the new growth looked a lot hardier with deep green leaves.  I’m paranoid that the pale, burnt leaves will make my plants sick so I also did some pruning today and I must admit they look much healthier.

Peas, day 14

The weeds are also starting to grow so weeding will be put on the schedule soon.  This week we’ll have to string up the peas already.  Last year we left it too late and we fought with them all summer to grow on the chicken wire.

It’s exciting to see everything growing so well.  I love my garden but I worry profusely about the health of my plants and the bugs that will attack them.  Once things start to dry I’ll have to get out there with my shaker of DE.


I've included a few other photos.  As there isn't really too much to see yet I haven't posted pictures of everything.  In the future as things continue to grow there will be more to show. :)


Radish, day 14

Beans, day 14

Onions & Garlic, day 14

Carrots, day 14


June 04, 2011

Mother Nature Can Be Down Right Mean

“Now and then it seems to happen, time to time, Snow in June”

(The first person to tell me who sings that song can have my first zucchini, but you have to come get it.)
Remember how I said I didn’t think Mother Nature was done with winter? Well, I was right.  Thursday it was 23C and sunny, Friday it was 2C and snowing.   Friday was a nasty, nasty day.  The morning was cool and wet, the thermometer said 5C and Environment Canada said it felt like minus 2C with the wind. Jez, a wind chill in June - welcome to the Peace Country.  The temperature slowly dropped to 0C (with a wind chill of -5C) and the rain turned to snow but thankfully didn’t start to accumulate until late afternoon.  
After work we rushed home to cover the garden to protect the new tender seedlings from the snow and to trap whatever heat we could.  The snow was a concern but not as much as the temperature – the forecasted low was -2C.   Thankfully it didn’t get that cold. 

Petunias & Snow

Rhubarb & Deer Fence weighed down by wet snow

Raspberry Plants & Snow
 
A Sea of Blue Plastic
 Friday was our coldest June 3 on record since 1943.  June 3, 1943 it was 1.7C, yesterday our low was -0.1C.

We uncovered everything late in the morning on Saturday and everything was okay.  The only damage I could see is a few purple leaves on a broccoli plant.  I was most concerned about the tomato plants, which fortunately, seem healthier now then Thursday due to a reprieve from the high UV we’ve have this year.

Hopefully we are done with the snow now.

June 01, 2011

My (Potential) New BFF

I hate most bugs, especially when they do damage to my garden.   We had trouble with grubs, ants and root worms last year and probably will again this year.  So far this year the ants have been particularly bad. 
It’s easy to find insecticides to kill bugs but extremely difficult, if not impossible, to find something that you can use on your vegetable garden.  When it comes to ridding your garden of insects the only safe route to go, it seems, is to go organic.  In my quest to get rid of these pests I stumbled upon what will hopefully be my new best friend – diatomaceous earth.
Diatomaceous Earth (DE) is a naturally occurring, soft, siliceous sedimentary rock that is easily crumbled into a fine white to off-white powder.  It consists of the fossilized remains of diatoms, a type of hard-shelled algae.  Deposits of this material can be found throughout the world and are mined for many uses.  Among other things, it could be found in dynamite, kitty litter, toothpaste and now my garden.

Diatomaceous Earth

DE feels like a fine, soft powder and is composed of millions of tiny, jagged edges that spell death for a wide variety of garden trouble-makers.  It works by cutting the pest, causing it to dry up and die. It can be sprinkled on ant hills, on the ground to create barriers, and on plants the pests eat therefore becoming embedded in them or causing internal damage.  And the best thing yet – its 100% organic.  The only downfalls I can find are (1) because it is a fine powder you have to be careful not to breathe too much of it in and (2) you have to reapply after it rains.

I’m no DE specialist but a reoccurring point that I kept stumbling upon during my research was that there are different types of DE and that natural DE is classified as amorphous silica and that you only want natural DE that has less than 1% crystalline silica and is mined from fresh water lakes: a point I feel obligated to pass on.

Anyway, I found a container of food grade certified organic DE from my seed supplier.  A 1 kg container would have set me back $20 plus shipping.  Due to the possible postal strike, I didn’t want to order it as I wanted it now. During my research I had read that farmers use DE to keep insects out of their stored grain and that they feed it to their animals as a mineral supplement and to eliminate intestinal parasites.  A few quick clicks on the UFA website lead me to a 22.6 kg bag of DE for $30. (That’s $1.33/kg vs. $20/kg – WOWSERS!)  The DE was amorphous silica, 100% natural and was mined from an old fresh water lake bed in Manitoba – check, check, check and Canadian to boot!  It’s not certified organic nor is it labeled food grade but if they feed it to cows I think it’s safe to put on my garden.  (I’m also thinking those two points are responsible for the difference in price.)

Needless to say we now have a 50 lb bag of DE in the garage.  We used it last night for the first time.  Steve mixed it with a bit of icing sugar to attract the ants and spraying away he went.  Once my turnip, radish, broccoli and onion seedlings in the garden are bigger I’ll dust them with DE (minus the sugar) to keep the Root Flies off them.


DE on now inactive ant hill

DE on ants along edge of garden

If DE works we’ll use it forever and will be sure to spread the word.  It’s ironic that farmers have been using it for years and you can’t find it in the pesticide isle at a department store, I think it’s a conspiracy.

Note of Caution:  DE will kill the good and the bad bugs so use your discretion when applying to your garden.  I will avoid using it where the lady bugs hang out (they eat aphids) and on any flowering plant because I don’t want to kill the bees.