July 30, 2011

The Thinning List

The items on my list to be thinned included: shallots, green onions, turnips, beets and carrots.

I didn’t have many shallots and green onions to thin which was a good thing because in my opinion, they are the worst plants to thin.  They break easily and are deeply rooted.  I lightly thinned them, leaving about a fingers width between them.  They’ll hopefully need to be thinned again but by then they’ll be big enough that we can use the ones being pulled.

When I thinned the turnips I did so very liberally.  Their roots were just starting to develop into turnips so they came out easily.  When thinning the turnips I couldn’t just start pulling plants.  My turnip row consisted of a variety of plant sizes and I wanted to keep the healthier, large plants so I had to look ahead and plan what to pull and what to keep.  I tried to space them about a hand’s width apart.  Depending on how well they grow they may need more thinning; if they do, we should be able to eat what I thin the second time around.
Between the shallots, onions and turnips there was only about one full row (approx 35 ft) of plants to thin.  I was able to do this one night after work.  The carrots and beets took a lot long than an evening to thin.  I have one row of red beets, half a row of golden beets, and two rows of carrots; that’s approximately 55 feet of beets and 70 feet of carrots that needed to be thinned.  To make matters worse, the rows were thick with plants.  It took me two afternoons to accomplish this task, and what a back breaking task it was, but at least now I can say it is done.

Because the beets and carrots were so over crowded, I didn’t have to worry much about pulling out the larger plants because they were all similar in size.  If I did come across a larger, more established plant, more so in the beets, I worked around it removing the smaller ones instead. 

I spaced the carrots about a finger’s width apart and the beets about three fingers width apart.  The carrots are a little close together but as they grow we’ll start to eat them and what we pick to eat we’ll do so as if we were thinning them.  I think the beets are spaced far enough apart so they shouldn’t need to be thinned again.
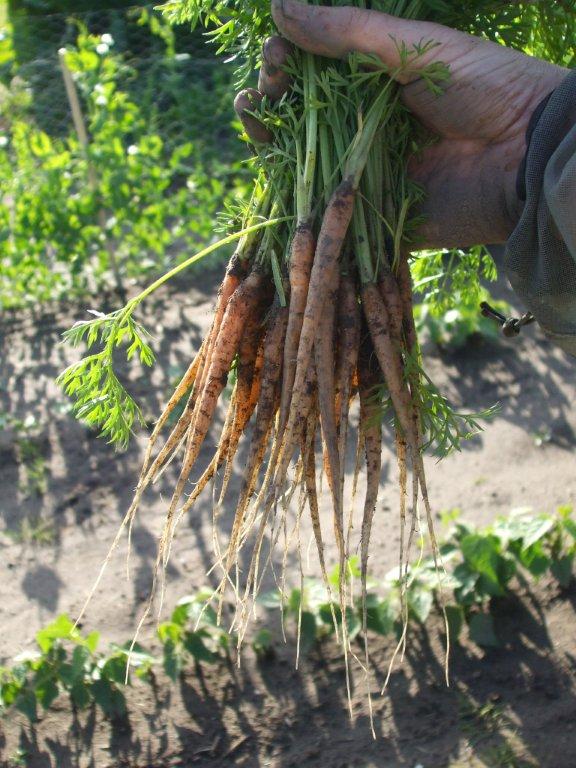
Out of everything I thinned, there was nothing that would have been worth eating… except for one small bunch of carrots.  Thankfully the thinning is done and now things have a chance grow and produce.

Thinning the Root Veg

This is a blog I’ve had in my head for too long so I figure its time to sit down and type it out.
Almost two weeks ago I finally managed to do my thinning in the garden.  It was a task that was well overdue but because of all rain it was impossible to do.  It was still quite wet when I did the thinning: my fingers were constantly caked with wet dirt and my butt was soaked right through from sitting on the ground.  It wasn’t the most comfortable experience but at least the bugs weren’t too bad and the sun was shining.  In a way it was a bit of a blessing that it was so wet as the plants I pulled released from the dirt easily.  Last year when I did my thinning I had to water everything first or I won’t have been able to remove anything; the dirt was so dry and hard it was like pulling the plants out of concrete.
When I do my thinning I wait until the plants are a decent size and the roots of the surrounding plants can handle being disturbed without damaging anything. If you thin your plants by pulling when they are too small you can do more harm then good.  I’ve read on other blogs and garden websites that the best way to thin is by cutting the plants at dirt level when they are extremely young.  I’m not to sure what to think about this, I would probably get carried away and cut too much and then end up with no plants.  I prefer to pull the plants and do so when they are larger because then I can work around “dead spots” and actually get a grip on something.
Thinning plants can be a tedious task but is something that needs to be done.  How heavily you seed in the spring determines how much plants you need to thin.  I tend to seed quite heavily which makes more work for me as I end up having to pulling a ridiculous amount of plants.  Every year I tell myself next year I won’t seed so heavily but I always seem to forget.
Twisted Carrots - a sign of over crowding
When you’re done your thinning your garden can look quite different, mine looked a little anemic.  Thankfully it’s something that is worth your time doing.  It doesn’t make sense but by actually decreasing the number of plants you are increasing your yield.  It’s also amazing how much the remaining plants will grow once they have room.  In the time since I did my thinning the plants look much larger and healthier; hopefully they are starting to develop actual vegetables now.
Before Thinning the Beets & Carrots

After Thinning the Beets & Carrots

July 29, 2011

Friday Night Special: Fresh Broccoli

Friday at our house is normally Pizza Night. Tonight we are straying from this and having a “proper” dinner: BBQ pork chops, egg noodles and broccoli.  The reason for this - the broccoli in the garden is threatening to flower so it’s time to harvest and eat it.

Broccoli starting to flower
Broccoli Flowers
This will technically be my second picking of broccoli; a few weeks ago I picked a few small pieces because they were starting to flower.  After being picked and washed they sat in the fridge for a few days and started to wilt so I want to eat this batch right away.

I learnt some interesting facts about broccoli this year.  I learnt that it prefers a cooler climate and will flower quickly in warmer temperatures, that when you pick the main stock of the plant it will start to grow other floret’s where the leaves meet the stock, when you remove the florets from the plant do so by cutting on an angle so water doesn’t pool on the cut stem or it will rot, and that when you get big leafy plants with little florets if you break off the big leaves the florets will grow larger quicker.  I also learnt that I can plant the plants a lot closer together and that I need a lot more plants if I want more than a few meals.


This year I only planted 4 plants: two are extremely stunted, one is mediocre at best, and one is flourishing.  All four plants came from the same greenhouse, were planted at the same time, and were the same size at planting so I don’t know what happened.  I have a feeling the roots may give me some insight into this, but that will have to wait until we pull the garden in the fall.  Since only one plant is producing anything significant, hopefully we will still be able to get more broccoli this year.

Surprisingly I didn’t have any trouble with bugs in the florets – knowing my luck next year this probably won’t be the case.  Because I was worried about the bugs I was a proactive and keep my plants dusted with DE and this seems to have done the trick.

Like most vegetables we eat with a meal, we steam broccoli.  The fresher it is the faster it cooks and the more vibrant the color is.  We usually serve it will a little Becel and occasionally some grated cheese.  We like to make veggie trays with dip and also eat a lot of raw broccoli this way but I didn’t think my harvest will extend past this dinner.

My only happy plant.

Empty Plant and Harvested Broccoli


Anyway, here’s to the first feast of our garden fresh broccoli! Cheers!

July 26, 2011

Swiss Chard Is On The Menu

Last night we had Swiss Chard from the garden for the first time this season and it was absolutely amazingly. 

We eat a lot of Swiss Chard fresh out of the garden in the summer.   Like most leafy vegetables, it is full of vitamins and minerals, iron included.  I find the flavor fairly mild and the fresher it is, the better it tastes.  You may find that it makes your teeth feel fuzzy and that they squeak if they rub together: this is because of all the minerals in it.

When cooking Swiss Chard it can be boiled, steamed (our preference) or sautéed.  I’ve never heard of anybody eating it raw but I’m sure people do.  If you wanted to get creative with it, I’ve heard of people using the larger leaves as a substitute for cabbage when making cabbage rolls. 

Last night we steamed it and top it with some Becel, Steve added pepper to his.  Some people, my parents included, like to douse it with vinegar, my dad even goes as far as putting ketchup on it. (I’m not joking.)

This is how much I picked.....

.... and this is what it cooked down to.


I find Swiss Chard pairs well with red meat.  Last night we had one of our favorite summer meals: BBQ Steak, steamed Swiss Chard, sticky rice and beans – yum!


When cooking Swiss Chard, especially if you are not boiling it, you have to clean it very thoroughly.  Because the leaves are not flat, they are quite wrinkly for lack of a better word; they tend to hold a lot of sand and dirt.  If you don’t clean it well, the grit can quickly destroy a wonderful meal.  I try to soak it at least twice; transferring it between the kitchen sinks each time to avoid contaminated the second soak with dirt from the first soak.


Above: Swiss Chard soaking

Right: sand in the sink after soak # 1


Swiss Chard is a lot like spinach but the stocks and leaf veins are thicker and they can be a little tough so it needs to be cooked a little longer than spinach.  You can get different types of Swiss Chard where the stocks and veins are different colors: mainly white, orange or red.  I grow the traditional type with the white stocks.  The white stocks make it easy to distinguish the Swiss Chard from the spinach when it’s in the freezer.

Unlike spinach, Swiss Chard tends to grow back very well and fairly quick.  You also don’t have to worry about it going to seed.  Swiss Chard is a bi-annual plant and only seeds in its second year of growth.  Because of this we are able to eat it throughout the summer and still have a decent amount to blanche and freeze in the fall.

Here's to eating a lot of fresh Swiss Chard in the month(s) to come!

July 20, 2011

The Art of Blanching

Because of the large volume of vegetables we get from the garden, it is impossible to eat everything fresh.  Last year to preserve our harvest we stored the carrots and potatoes in the cold room, canned the excess tomatoes, pickled the beets,  and froze the peas, beans, turnips, spinach, swiss chard and remaining zucchini.  In order to preserve the taste and quality of the vegetables that were frozen (excluding the zucchini) we blanched them first.
What is blanching?  Blanching is a cooking process which is intended to enhance the color, flavor and texture of vegetables.  Blanched vegetables are quickly cooked in boiling water (or steamed) and are then “shocked” by being plunged into an ice cold bath that immediately stops the cooking process.  When blanching vegetables they are not cooking completely, the cooking process is merely started and then abruptly stopped. 
Blanching vegetables before freezing is highly recommended.  Blanching will neutralize any bacteria and enzymes in the food which could cause it to go bad.  If done properly, it will also ensure that your vegetables stay flavorful and colorful in the freezer.  If vegetables are frozen without being blanched they tend to discolor and the thawed product will likely be a mushy, ill tasting mess.
Over the past few years I’ve learnt the art of blanching vegetables.  Here are a few key points that I’ve learnt.
1)      Not all vegetables are blanched for the same amount of time.  Different preparations also affect the blanching time.  If you blanche vegetables too long or not long enough they won’t freeze well and your time and work will have been wasted.
(I was originally going to include a chart of vegetables and blanching times but the list became quite extensive.  It is best to research to necessary blanching time before getting started:  my most reliable source is my Joy of Cooking Cookbook, but if my laptop is handy I usually head straight to the internet.  Be careful though because not everything on the internet it correct!)
2)      Have lots of ice and don’t be skimpy with it.
3)      Be 100% prepared before you start.  Before I start I make sure of the following: my vegetables are cleaned, chopped and ready to go, I have the biggest pot I can find ¾ full of water heating, a kettle of hot water to top off my pot if needed, the biggest bowl I can find full of super cold water and ice, extra ice, strainers, a spare bowl, something to take the veggies out of the boiling water, and a timer.
We have an Eastman Outdoor Wok Burner that we use when we do our blanching.  It would be nice to be inside in the kitchen but the burner works incredibly fast and all the “wet” mess is left outside and I don’t have to worry about getting water on the hardwood. 
Blanching Steps:
1)      Once your water is boiling, place a batch of the vegetables into the boiling water for the desired time.  Make sure your vegetables BOIL for the specified time.  If you try to do too much at once you’ll reduce your water temperature and it’ll take longer to recover.  In order to blanche properly, your water must be boiling for the specified time.  If your water cools, wait for it to come back to a boil before starting your timer.  (When you blanche multiple batches, depending on the vegetable, your water may get dirty or foamy.  If this happens you should dump it and start again with fresh water.)
2)      Once the blanching time has expired, remove the vegetables quickly and carefully from the boiling water and place into your ice water. (I use a Chinese Brass Spider Skimmer to scope and strain the vegetables before placing them in the ice water.  The more hot water you can remove from the vegetables before placing in the ice bath the better as the hot water will warm your ice water therefore slowing the cooling process.  Because I’m outside I don’t care about getting water on deck, if you are inside hold a bowl below your scope to catch the hot water.)
3)      Leave the vegetables in the ice bath until they are completely cool.  It is best to wait to blanche more vegetables until your ice bath is empty (unless you have multiple ice baths).  I usually eat a piece of the vegetable to see if it’s completely cool.
4)      Once cooled, remove from the ice bath and place in a strainer to drain.
5)      Once drained, portion and freeze.  When I portion my vegetables I take a dinner plate and put how much I think one person would eat on the plate, double it (there’s only two of us) and then in the bag it goes.  (I vacuum seal everything.)  Sometimes I use my scale to ensure equal portions but because of the residue water in some vegetables (i.e.: Spinach & swiss chard) the scale isn’t always a good gauge to determine equal portions.
Blanching can be timely process, especially if you have lots to do, but well worth in it the end. 
Ensure you have lots of time to complete the task before starting so you don’t end up like me blanching and freezing vegetables at 10:00 pm on a Sunday night. J
Here are some pictures of when I blanched the spinach earlier this week.

Removing the spinach from the soaking tub

The Set-Up

Boiling the spinach

Removing the spinach from the boiling water

Placing the spinach in the ice bath

Spinach cooling in the ice bath


Deciduous Dilemma

Let’s talk about trees for a few minutes. 
We love trees and wish we had more on our acreage.  Thankfully we do have a decent amount of trees; most new acreages in the Peace Country are built on land that was once farmed and have very few, if any trees.
Our mix of trees consists of a few different species of Poplar, Spruce and Pine.  They are scattered around our acreage but most border the north property line or can be found in the lawn in the NW section of our acreage.  Due to the abundant moisture this year they are all flourishing and boasting an extraordinary amount of new growth.  We pay special attention to our Pine trees in attempt to keep the Pine Beetles away:  we attach Verbenone pouches in early summer and spray them with Carbaryl throughout the year. (If we lost our Pine trees we’d be devastated.)
We would like to have more trees along our east property line but trees take forever to grow and are ridiculously expensive to buy.  I’m very excited about something I found that I hope will be a solution to our tree predicament and feel the need to share.
My solution to our tree predicament is this: Rooter Pots from Lee Valley:
I bought these a few years ago and was reluctant to try them because I wasn’t sure how well they would work, if they would work at all.  About a month ago I dug them out and put them to the test.  I placed the pots on branches of a fast growing type of Poplar and now I can proudly say I have more 5 trees that are about 3 feet tall.
This system and method for starting new trees works amazing well and I would recommend it to anyone who has and wants more deciduous trees.  In the instructions it says it can take up to 8 weeks for the trees to root and mine rooted in about a month.  If I don’t sit around too long and get my butt in gear I should be able to get a second batch of new trees before the fall. 
I’m so excited about how well it worked I have to show you the results.


Rooter Pot on Tree
             
Close Up of Rooter Pot

Rooter Pots removed from main tree

Close Up, see all the red roots

Cutting removed from Rooter Pot

Close up of roots in Rooter Pot

new tree being planted


2 of my new trees


July 19, 2011

Harvesting “Popeye”

Somehow, I don’t know how, but somehow during the cool, wet weather my spinach grew a foot and went to seed.  Because of the timing of it going seed and the weather conditions, it had to wait to be dealt with.  This wasn’t a big deal as after spinach goes to seed it’s still fine to eat; some say it gets bitter but I can’t really tell the difference.  I find it interesting though how the leaves change shape after it goes to seed.

Spinach gone to seed

I’m not a huge spinach fan, I prefer swiss chard, that being said, I do still grow it.  We prefer to eat our spinach cooked and use it in dips and spreads.  Our preferred method is to lightly steam it and serve it as a side dish at dinner.  (We top with a blob of butter and Steve seasons it with pepper.)
Although many people enjoy spinach salad I’ve never been a fan of it; I was never fond of the taste or texture of raw spinach.  People rant and rave about the health benefits of spinach and how you loss all the nutrients when it’s cooked – I say “PLLLBBBB” to that. (That was me sticking my tongue out.)  Spinach lightly cooked still has lots of nutrients and in my opinion is safer to eat than raw spinach – remember the many salmonella outbreaks from people eating raw spinach?
 In fact, did you know that raw spinach is hard to digest and that the nutrients are more easily absorbed if it’s cooked? Also, did you know that many of the nutrients that make a salad healthy are fat soluble, meaning that they must be eaten with some kind of fat in order to be absorbed?  So either add that Ranch Dressing to your spinach salad or cook it!
Now, I understand that some people cook the crap out of their food leaving it completing depleted of anything good, but it doesn’t have to be that way.  If you boil your spinach for 20 minutes there won’t be much good left in it; but if you steam or sauté it until just wilted, you are not going to deplete it of many nutrients and then it’ll be easier on your tummy.
Since we don’t enjoy raw spinach when it’s past its prime we harvest the entire crop.  Last Sunday I spent time in the garden picking the remaining spinach so that it could be cleaned, blanched and frozen.   After a bit of work I can now say that I have my spinach blanched and in the freezer.  (I had originally included the fine art of blanching here but decided to post it separately.)
I don’t seem to have good luck with my spinach re-growing so after we get one crop we pull the plants and are done with it.  This year because of the cooler temperatures I’ve attempted a second planting – hopefully it won’t bolt as soon as it’s up and we’ll get a second crop for the freezer.